
Whether your office runs a mix of Linux, Windows, and macOS systems or you simply need to share files securely between machines, Samba is one of the fastest and most reliable solutions available. Samba enables cross-platform file and printer sharing using the SMB/CIFS protocol, the same one Windows uses natively.
In this guide, you’ll learn how to install, configure, and connect to Samba on Linux and Windows systems in just a few minutes. I’ll also cover best practices and troubleshooting tools to ensure your setup runs smoothly.
Why use Samba file sharing?
Samba has long been the go-to solution for organizations that need seamless interoperability between Linux and Windows. It’s free, open source, and fully compatible with Windows file sharing, allowing users across platforms to access the same network shares securely.
For IT teams in small and midsize businesses, Samba provides a simple way to manage shared resources without deploying an enterprise-level server. Once installed, it integrates easily with your existing systems and can even authenticate users through Active Directory.
Step-by-step guide: How to set up Samba file sharing
To accommodate various platforms and systems, I focused on providing code snippets in this demonstration, allowing you to easily copy and paste them into your terminal to start sharing files with Samba.
Note: You should alter the instructions according to your distribution of choice
1. Install Samba
Begin by installing the Samba package on your system.
For Ubuntu/Debian:

For Red Hat/Fedora/EndeavourOS:

Once installed, verify Samba’s presence:

You should see entries for /usr/sbin/samba, /etc/samba, and related directories.
2. Create and configure the shared directory
Create the folder you’ll share across the network and assign appropriate permissions:
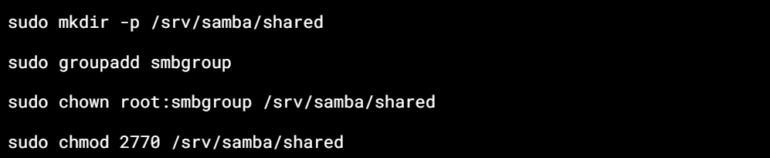
If your system uses SELinux (e.g., Fedora, RHEL), label the directory for Samba access:
![]()
This command sets the SELinux context type for the directory /srv/samba/shared to samba_share_t. Therefore, this configuration enables Samba to perform read and write operations in that directory, facilitating proper access for file sharing.
3. Edit the Samba configuration file
Open Samba’s main configuration file:

Once you have the file open, you can enhance its functionality by adding a share definition at the end of the document. This will allow you to specify the settings for the new shared resource.
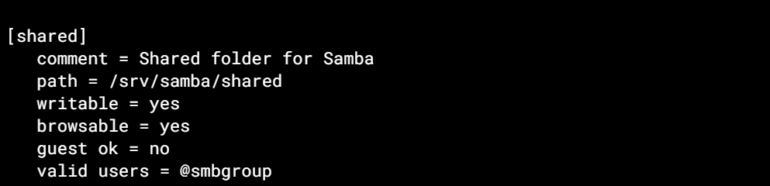
Save your changes by using the sequence: (Ctrl + O, then Enter, then Ctrl + X).
4. Add a Samba user and enable the share
To add a Samba user, you first need to ensure that the user already exists in your Linux system. This process enables Linux users to access shared resources over the Samba network.
![]()
Then enable the account:
![]()
✅Expert tip: To access the shared folder, the user must be a member of the smbgroup. Add them with:

Restart the Samba services to apply changes:

5. Configure the Firewall
Samba utilizes ports 137, 138, and 139, which are part of the NetBIOS protocol, as well as port 445, which is used for SMB (Server Message Block) over TCP/IP. By opening these ports in your firewall or network settings, you will enable devices to locate and communicate with each other effectively during file sharing.
Ubuntu (UFW):

RHEL/Fedora (firewalld):

6. Verify the configuration
Before connecting, test that Samba is configured correctly by:
✅ Checking for syntax errors:
![]()
- Parses /etc/samba/smb.conf and reports any syntax issues.
- Prompts you to press Enter to view the complete parsed configuration.
✅ Listing the available shares:
![]()
- Lists all shares available on the local Samba server.
- -L = list shares.
- -U username = log in as the specified Samba user.
- You’ll be prompted for the Samba password set with smbpasswd.
If your shared folder appears in the list, the setup is complete and the server is functioning correctly.
Connecting to Samba Share
After installing and setting up Samba, verify that other devices on your network can access your shared folder. Whether you’re using Linux, Windows, or macOS, connecting to your Samba share is straightforward; you simply need to provide the correct path and credentials.
Connect from Linux (GNOME/KDE)
GNOME Files (Ubuntu, Fedora, Debian):
- Open Files (also known as Nautilus).
- In the left sidebar, select Other Locations.
- In the “Connect to Server” field, enter one of the following:

Or use the IP address if name resolution isn’t configured:

- Click Connect.
- When prompted, enter your Samba username and password (This is the Samba account created using smbpasswd, not the system password, unless they’re the same.)
- Once connected, the share will:
- Appear in the sidebar under Networks or Bookmarks.
- Be accessible like a local folder.
- Optionally, be bookmarked for easy future access.
KDE Dolphin (Kubuntu, Fedora KDE, EndeavourOS):
- Open Dolphin (the KDE file manager).
- In the sidebar, go to Network → Samba Shares.
- You can either:
- Browse available shares, or
- Manually enter the address in the location bar using:

Or

- When prompted, enter your Samba username and password.
If the Samba Shares option isn’t visible:
You may need to enable usershare support (for easier browsing and sharing via GUI):

- 1770 gives directory write access to users in the sambashare group.
- This is not required for accessing shares, but enables GUI-based sharing in Dolphin (or Nautilus).
- You may also need to add your user to the sambashare group:

Note: Log out and back in for group changes to take effect.
Connect from Windows
- Open File Explorer.
- In the address
Using hostname:

Using IP address (recommended if hostname resolution is unreliable):

- When prompted, enter your Samba username and password.
To map the Samba share as a network drive:
- Right-click This PC in File Explorer.
- Select the Map network drive.
- Choose a drive letter (for example, Z:).
- In the Folder field, enter the same path: \\192.168.x.x\shared
- Check Reconnect at sign-in and Connect using different credentials.
- Click Finish.
Connect from macOS
- In the Finder menu bar, select Go → Connect to Server.
- In the Server Address field, enter one of the following:
Using hostname:

Using IP address:

- Click Connect.
- When prompted, enter your Samba username and password.
|
|
Troubleshooting and best practices
Even well-configured Samba servers can hit snags. Here are a few quick checks before you dig deeper:
Verify service status
Make sure the Samba daemons are active and running:

- smb: Manages the SMB/CIFS protocol (file sharing).
- nmb: Handles NetBIOS name resolution and browsing.
If either service isn’t active
Restart both services using the following:

After completing these steps, both services should be active and running.
Check logs for detailed errors
To diagnose authentication failures, denied connections, or misconfigurations, review the Samba service logs:

Reviewing the logs is especially useful for identifying:
- Authentication issues (NT_STATUS_LOGON_FAILURE, etc.)
- Share access errors
- Configuration syntax problems
- SELinux denial messages (on SELinux-enabled systems)
List shares remotely
From your Linux terminal (or another Samba-capable client), list the shares offered by your Samba server:

You can also:
- Replace hostname with the actual hostname or IP address of the Samba server.
- You’ll be prompted for the Samba password of the specified user.
- You should see a list of available shares, including the one you configured (e.g., shared).
If the share doesn’t appear
- Double-check your Samba configuration files for issues

Look for:
- Typos in share names or paths
- Missing or incorrect [shared] block
- Permission issues in the shared directory
- Misuse of parameters like valid users
Then re-test using testparm:
![]()
Confirm network access
Check host reachability from a client.
Use ping to verify that the Samba server is reachable over the local network:

If this fails (e.g., “Name or service not known”), it’s likely a DNS or NetBIOS resolution issue.
Try the Direct IP Address.

Replace 192.168.x.x with the actual IP address of your Samba server.
Test Samba access from a Windows client.
In File Explorer’s address bar, enter:

- If the server is reachable and Samba is correctly configured, the share should open.
- If not, investigate:
- Firewall settings
- Samba service status
- Share permissions
- Network profile settings (e.g., “Private” vs. “Public” network in Windows)
Validate permissions and SELinux context
Check directory permissions.
Make sure the shared directory has the correct ownership and mode:

You should see something like:

- Owner: root
- Group: smbgroup
- Permissions: 2770 (setgid bit ensures new files inherit group)
Check SELinux context (SELinux-enabled systems like RHEL/Fedora).
For systems with SELinux enabled (e.g., RHEL/Fedora), verify the security context:

Look for a context like:

When using Samba, it’s important to set the context correctly. Otherwise, access may be denied even when file permissions are appropriately configured. For example, if the Samba configuration defaults to a context such as ‘default_t’, it could lead to unauthorized access.
Apply Correct SELinux Label (if needed).

Note: This change is temporary and will be lost after a relabel or reboot. For a persistent fix, use:

With these quick checks, you can efficiently troubleshoot and maintain a stable, secure Samba environment for testing, small business networks, or cross-platform collaboration.
Networking: Must-read coverage
Cross-platform file sharing made simple
With Samba, you can quickly connect Linux, Windows, and macOS systems without the need for complicated setup or licensing expenses. By supporting both UFW and firewalled, adding SELinux context management, and offering both GUI and CLI test options, you can ensure smooth and secure file sharing across your organization.
SEE: How to create a passwordless guest share in Samba for more information on file sharing.
Frequently asked questions (FAQs)
How secure is Samba file sharing for business networks?
Samba file sharing is secure when properly configured and administered. IT admins can enable encrypted connections, restrict user permissions, and integrate with Active Directory for centralized authentication. Regular updates and firewall rules further enhance Samba’s security in business environments.
Can Samba file sharing be integrated with Active Directory?
Yes, Samba can integrate with Active Directory for centralized authentication and domain-level permissions. This setup enables IT admins to manage user access through existing AD policies, enhancing security and simplifying user management across mixed Linux and Windows environments.
Is Samba file sharing suitable for small business networks?
Absolutely. Samba file sharing is an affordable and versatile solution for small businesses. It offers dependable cross-platform file access without costly licensing, and it easily scales — from a basic shared folder to domain integration with full user management.